Refereeing is a show. It’s all about showmanship.
If you are my AR, the first thing I want from you is clean flagging. Do you have to be perfect? No. Do you have to make the perfect call? No. But the touchline is watching you, and if you show a good, clean, confident flag, they will trust you. Even if the referee overrules.
The four signals you need for your first game
Throw-ins
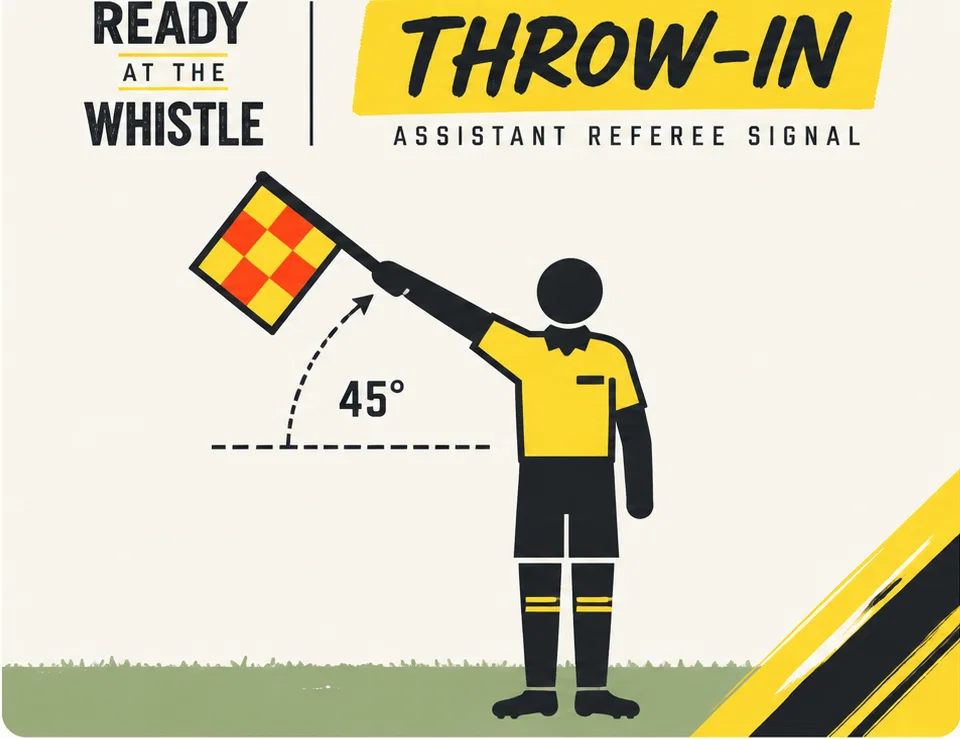
You call throw-ins many, many times in a game. Get this one right.
When learning, just focus on getting near where the ball went out. Face the field, hold the flag in the hand of the direction you are going to point, and raise it to 45°. Not 15°, not 80°, 45°. If you’re a clock, it’s 1:30 or 10:30 depending on direction. (These are not Laws of the Game requirements, but ideals in my opinion.)
Yes, as you gain experience, there will be some changes to how this works. But stick with this until you are comfortable and confident.
Do not move your feet while flagging. Do not flag and walk. Do not flag and try to stop a ball that is going out of bounds. I can’t remember the last time I interacted with a ball when I was AR, and that is a good thing. Maybe fetching a game ball for the center before a match.
Which direction do you point?
There are a few ways to think about this. I’ll give you three, starting with the technically correct answer and working down to shortcuts that are easier to use in the moment, but less reliable. The further down you go, the more you’re relying on experience rather than the actual rule.
- The technically correct answer: Point toward the thrower’s attacking goal. The team that did not touch the ball last gets the throw-in, and you point toward the goal that team is attacking. This is the answer you should learn first, and the one that is always correct.
- The shorthand: “The direction of the throw.” Imagine you’re the player taking the throw-in. Which direction would you throw it? This is a useful way to remember the signal, but it isn’t technically correct. The thrower is perfectly free to throw the ball backward.
- My shortcut: Point in the opposite direction from the way the ball was going. This works surprisingly often, and it’s generally how I process these calls. I watch which way the ball is traveling and my hand can go up quickly and confidently in the opposite direction. The trick is that, with experience, my brain has learned to recognize the exceptions. Maybe there was a deflection. Maybe the ball was traveling backward. Sometimes what initially looks like an obvious call is actually the opposite.
The point isn’t that the shortcuts replace the rule. They don’t. But as you get comfortable, you’ll start recognizing patterns that help you make these decisions more quickly. Just remember that the further you get from the technical answer, the more opportunities there are to get it wrong.
Three other signals you want to be really clear on before your first game: goal kick, corner kick, and offside.
Corner kick
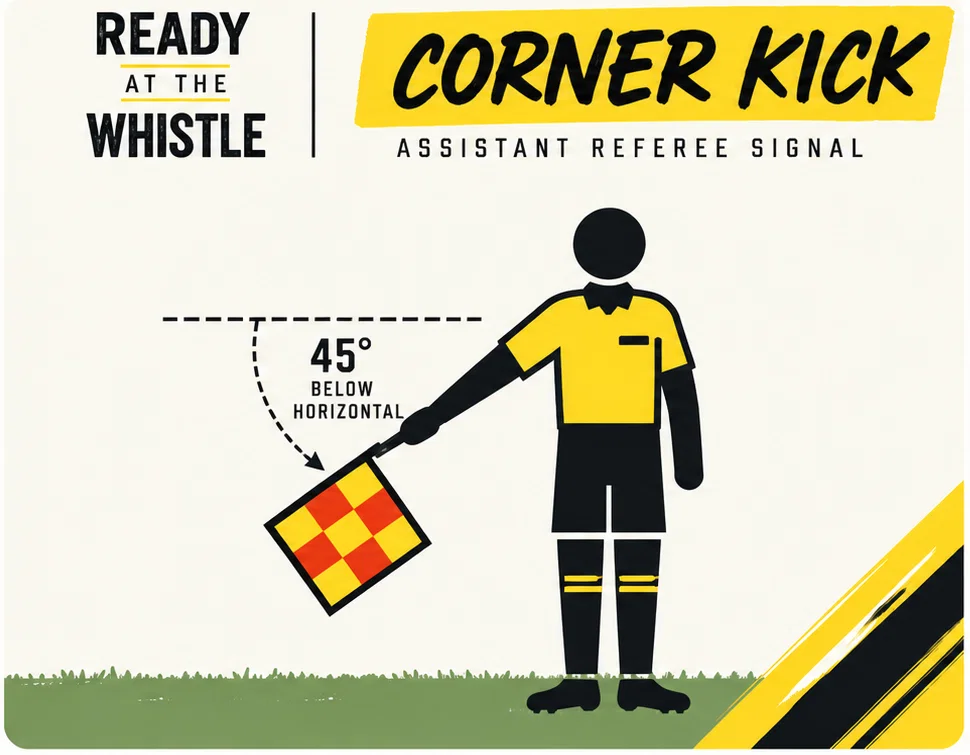
When calling goal kicks and corner kicks, it helps to be as close to the restart as possible. Remember, you are communicating with the referee. If you’re in the wrong position, it can be a little tricky to tell the difference between a goal kick and a corner kick signal.
For a corner kick, you should be standing close to the corner. Your flag points about 45° downward, toward the corner. If you’re far from the corner, that angle gets flatter and flatter, until it starts to look like a goal kick.
Goal kick
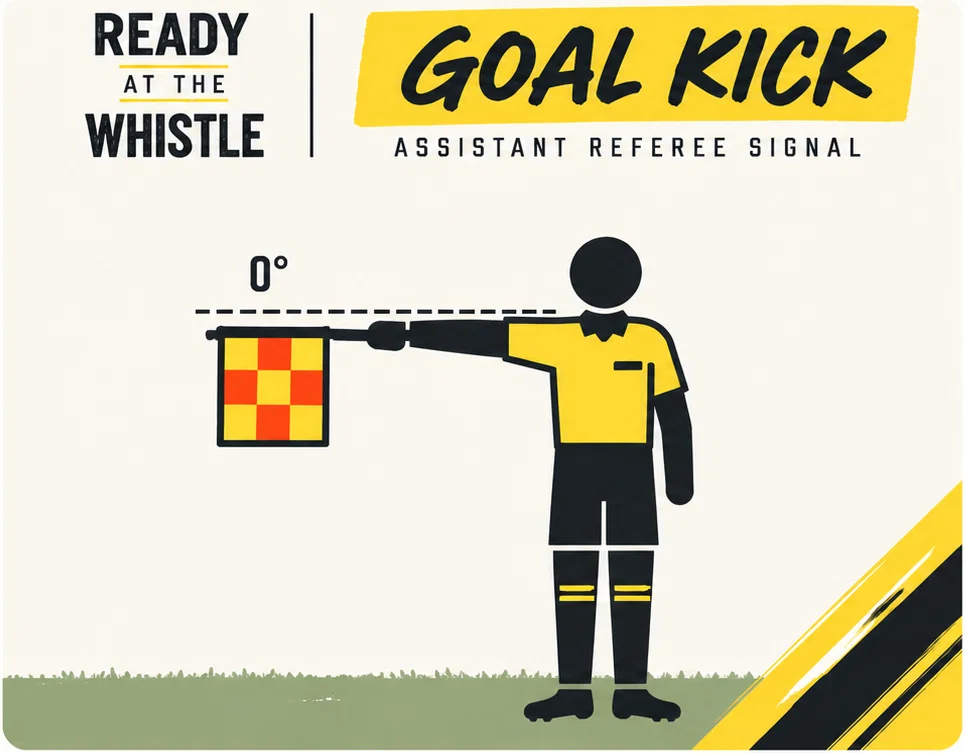
For a goal kick, point straight toward the goal. The flag should be at about shoulder level, held horizontally at a 0° angle.
Offside
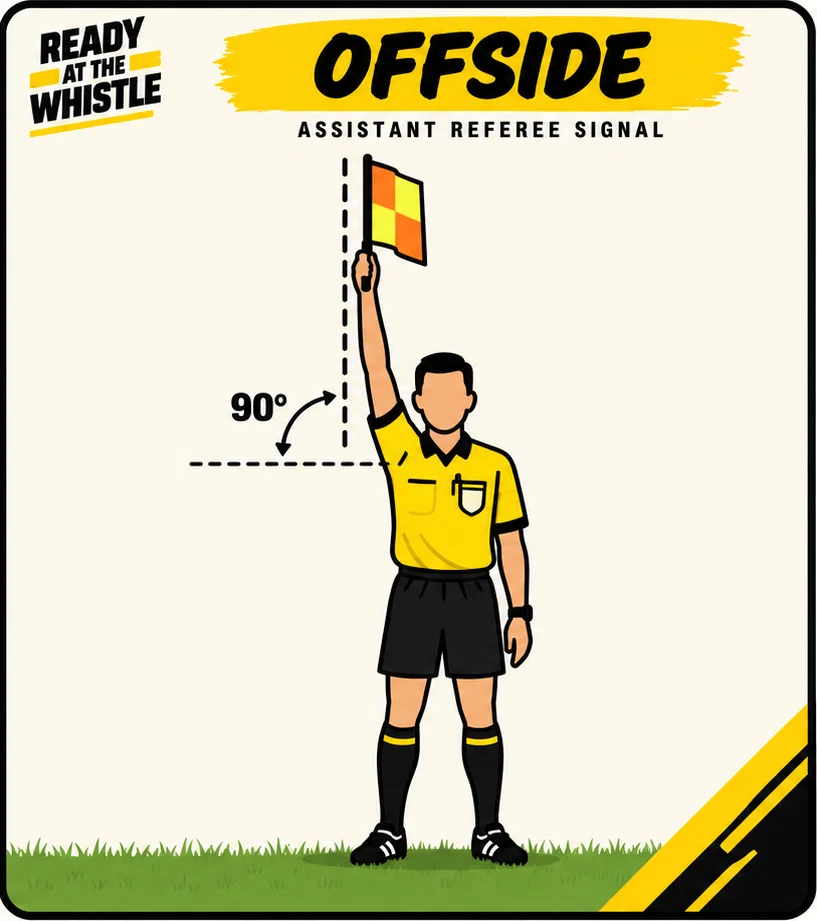
Your other signal is offside. If you see that a player has committed an offside offence (not merely that they’re in an offside position), raise your flag straight up.
Stay in the same place. Look at the referee until they see you. Keep holding that flag up until the referee acknowledges it or the defending team clearly gains control of the ball.
New ARs will sometimes drop their flags too soon, but a center referee may not notice your offside flag immediately. These can be some of the most intense moments of a game, and the referee’s attention may be focused on the players. Often, the touchline that benefits will “help” alert the referee.
Once the referee stops play, there is a second signal to indicate where the offside offence occurred. We’ll leave that for the next stage.
What to learn next
Intermediate AR Signals
The previous section is designed to get you through your first games without overloading you with information. I expect my brand-new ARs to know those four signals: throw-in, goal kick, corner kick, and offside. The rest, I can get by without.
Once you have those down and are comfortable with them, it’s time to refine your flag skills. Here are a few dos and don’ts.
DO make eye contact with the referee. Remember, you are communicating with the referee. Yes, it’s a show for the audience, but it’s the referee’s show. You are a side character. Your job is to support the referee’s performance.
Eye contact is necessary to keep in sync with the referee, to know when you’ve been seen, and to know when you have their attention. It helps you function as one unit.
DON’T be the show. I’ve had ARs yell out directions, try to call all the fouls, aggressively wave their flags, snap loudly, all of it. It’s not their job.
This is undesirable because the assistant referee does not make the final decisions. The center referee does. When the assistant referee draws too much attention to themselves, the crowd expects their calls to stand. That makes it more difficult for the referee to maintain control of the game.
An AR’s job is to make things less difficult for the referee, not more difficult.
DO hold the flag straight down. You shouldn’t lock your arm. Your elbow should be relaxed, but when you’re not signalling, the flag should be pointed at the ground.
If you want to look like an AR who belongs there, run with the flag pointed at the ground. It’s just awkward enough to signal that you know what you’re doing, and it’s not that difficult.
The point is that it signals that nothing is being signalled. What a referee wants to see most from your signalling is differentiation. I don’t want to look at you and wonder whether you’re trying to get my attention for something.
DON’T call every foul you see. This should be handled during the pregame, but typically the referee wants you to signal fouls in your immediate vicinity, especially ones they might not have seen or where you have a much better view.
You want to avoid disagreeing with the referee as much as possible, and the simplest way to do that is to leave most calls up to them.
DO hold the flag in the hand closest to the referee. Once you’re starting to get really comfortable, start working on this one.
When an experienced ref first asked me to do this, I found it a little overwhelming. I’m still trying to get my calls right, and you want me to worry about what now?
But pretty soon, it became second nature. It signals to an experienced referee that you know what you’re doing. And when you need to switch hands to make a signal, it gives you a moment to think before raising the flag. Remember to make that switch below your waist.
One More Thing About Signalling ‘Offside’
I said we’d come back to this.
Offside is one of the few two-step signals. The first part is the flag straight up. That does the important thing: it lets the referee know that something happened. Once the referee sees your flag and stops play, it’s time for the second part of the signal.
At this point, the AR should be stopped on the touchline, roughly level with where the offside offence occurred. Now they need to indicate to the referee how far across the field the offence happened. The referee usually already has a pretty good idea, which is part of the reason I skip this for brand-new ARs.
The proper signal divides the field into three parts: far, middle, and near.
- Far: If the offence happened far from the AR, hold the flag about 45° upward.
- Middle: If it happened in the middle, point the flag straight out, horizontally.
- Near: If it happened close to the AR, point the flag about 45° downward, similar to pointing at the corner.
The idea is simple: the farther across the field the offence occurred, the higher your flag points.
What to remember on game day
- Throw-in: Point toward the throwing team’s attacking goal.
- Corner kick: Point down toward the nearest corner.
- Goal kick: Hold the flag horizontally toward the goal.
- Offside: Raise the flag straight up. Stay in place, look to the referee, and hold it until the referee acknowledges or the defending team clearly gains control of the ball.
One Thing Per Game
This isn’t an exhaustive article on AR signals. It’s just meant to get you through your first few matches and help establish a trajectory for where to go next.
I’ve left plenty for another day: which offences an AR should call, pregame discussions, types of flags, fouls, different referee interaction styles, and so much more.
My rule is always to learn one thing per game. Before each game, ask yourself: what do I want to focus on?
For your first game, it’s calling throw-ins and getting the direction right. You also need to know goal kicks and corner kicks, or you’re going to look lost.
From there, start adding one thing at a time, one game at a time. It’s amazing how quickly you can start looking like an expert.